Collection settings
Managing image content via the Data tab
The Data tab in collection settings is the single place you go for any change to a collection's images or metadata. This guide walks through every supported workflow with screenshots of the actual UI.
Last updated 2026-05-30
What kind of collection do I have?
The actions available in the Data tab depend on how your collection was created:
- Upload-based — you created the collection by uploading images directly, or by importing a zip. Every per-image action in this guide is available.
- Catalogue-sourced (IIIF, IDC, NASA, the Met, Kaggle, etc.) — the collection is a managed mirror of an external source. Adding or editing individual images isn’t supported because the next re-import would wipe your changes. Treat the upstream source as the system of record and trigger a re-import to pull fresh data.
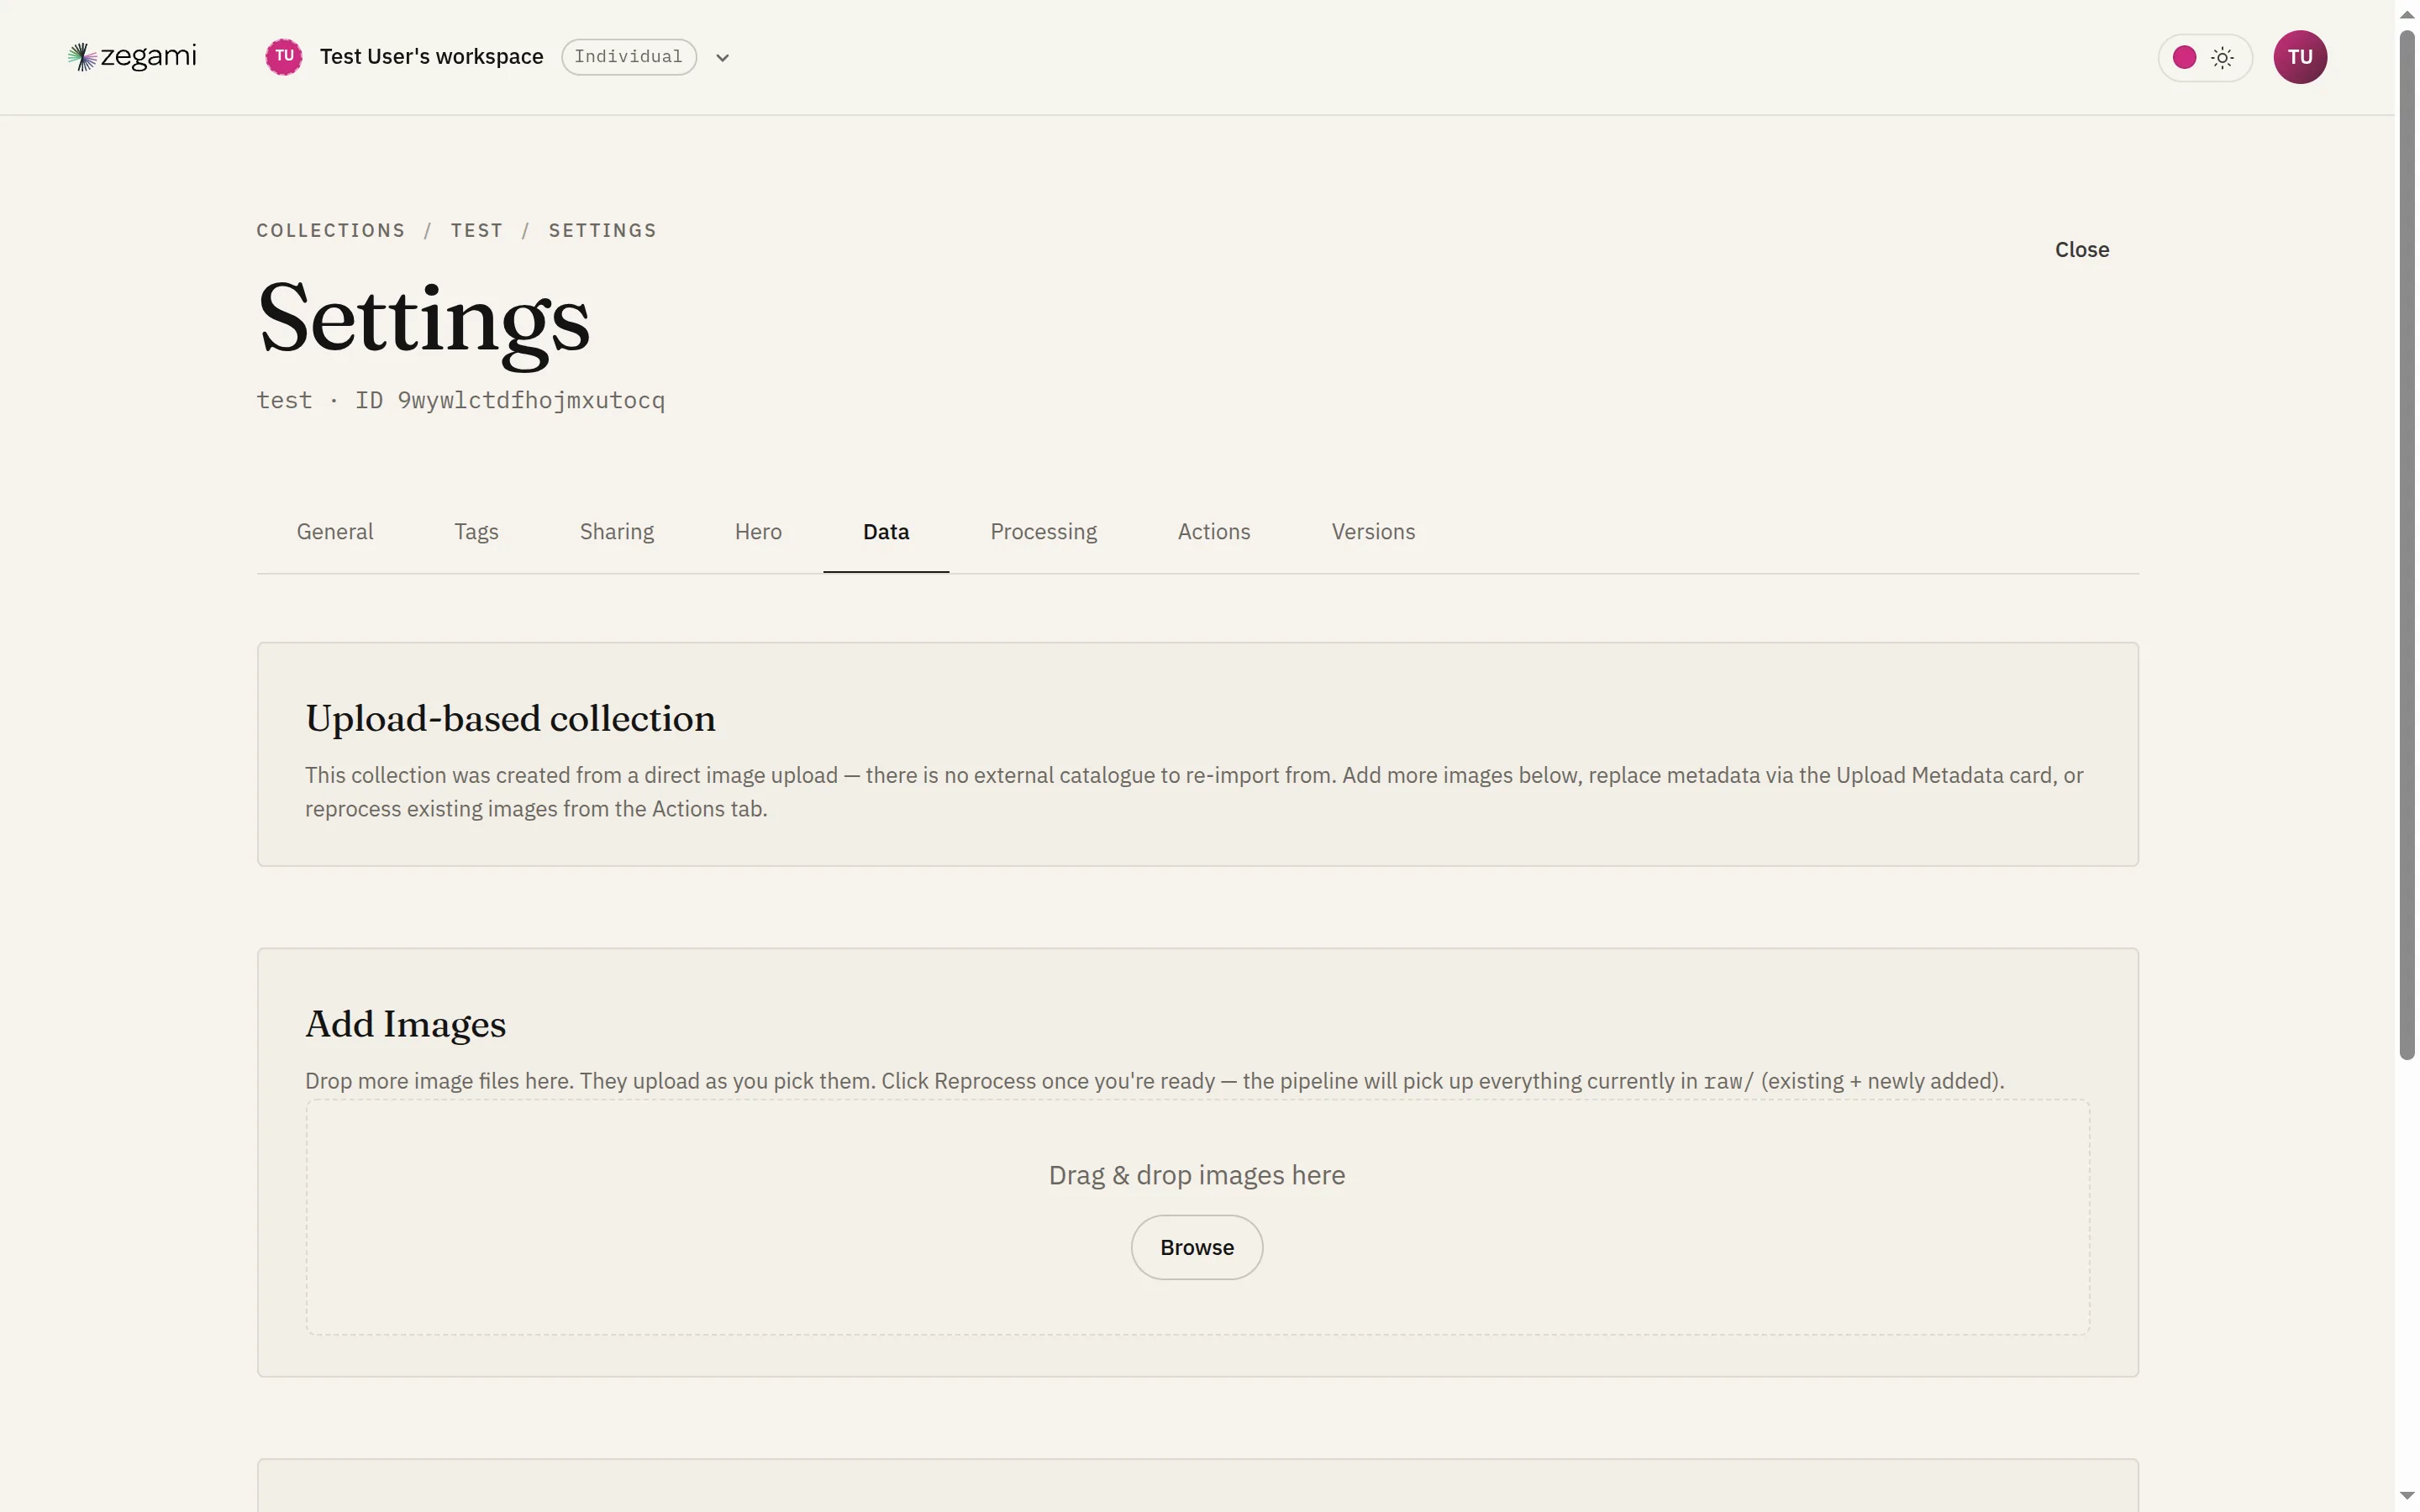
If you’re not sure which you have, open the Data tab. Upload-based collections show an Add Images card at the top; catalogue-sourced collections show their source name and a Re-import button instead.
Adding new images
For upload-based collections, the Add Images card accepts JPEG, PNG, TIFF, WebP, and BMP files. Drop a batch in (or click to pick), wait for the upload to finish, then click Reprocess collection. The pipeline runs Scale, Pyramid, Atlas, and (if your collection has them) LOD + Parquet from scratch for the new images — existing images aren’t reprocessed.
After reprocess completes you’ll see a “Processing 12 / 50 new images” banner that disappears when every step is done. The new images appear in the grid in upload order.
Replacing the metadata sheet
The Upload Metadata card replaces the entire metadata sheet — it’s not a patch. Download the current metadata as a starting point (the “Download current” link), edit it offline (Excel, Google Sheets, anything that round-trips CSV / TSV), and upload the updated file. The first column must be the identity column the collection was created with; every row in the new sheet must match an existing image by that column or it’ll be ignored.
After upload, click Reprocess collection. The pipeline only re-runs the steps that depend on metadata (Parquet, Layout, TDA if enabled) — image tiers stay cached so reprocess is fast.
Per-image actions
These controls live in the viewer, not in Settings. The Data tab handles collection-level changes (add images, replace the metadata sheet, reprocess). To edit a single image — replace, rotate, flip, or remove it — you do it from the viewer’s Inspector, as below.
Open the collection in the viewer and click any image in the grid to open the Inspector on the right. The pencil overlay in the thumbnail’s top-right opens the Edit panel, which hosts a compact icon toolbar with six actions (left to right): Replace, Rotate left, Rotate right, Flip horizontal, Flip vertical, Remove.
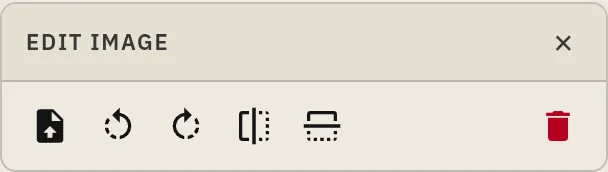
Each action runs against the focused image and stamps the collection as “needs reprocess” — a badge appears on the home page until you click Reprocess now to regenerate the atlas + derivatives.
Replace bytes
Choose Replace (file-upload icon) to overwrite this slot’s bytes with a new image. The chosen file’s filename is irrelevant — the bytes are written to the existing manifest path, so atlas + pyramid regenerate in-place on the next reprocess. This is the cleanest way to fix a wrong image in a large collection without re-uploading the whole batch.
Rotate and flip
The four directional icons — rotate 90° left / right, flip horizontal / vertical — apply a transform to the image bytes immediately. The Inspector thumbnail and the grid view’s tile both update right away (an “optimistic preview” before reprocess), and the badge appears prompting you to reprocess when you’re done.
You can stack transforms — rotate twice for 180°, or rotate then flip — before reprocessing. The pending count in the contextual zone below the toolbar tells you how many transforms are queued.
Remove
The trash icon removes the image from the collection. A two-click confirm protects against accidents. After removal, the image is hidden from the grid immediately (and from filters / scatter / search), and the badge prompts you to reprocess. After reprocess, the image is permanently gone from metadata, atlas, pyramid, and parquet.
Edit metadata
The same Edit panel has an Edit metadata section listing the item’s editable fields. Change a value and click Save — it applies immediately across the viewer (grid, table, filters) and is published for everyone, with no reprocessing: the change is written to the collection’s data directly, leaving the images and the scatter/cluster layouts untouched. Reset discards any unsaved changes. (On very large collections, Save still records the edit but offers a one-click Reprocess now to publish it, since refreshing the whole data file each save would be costly.)
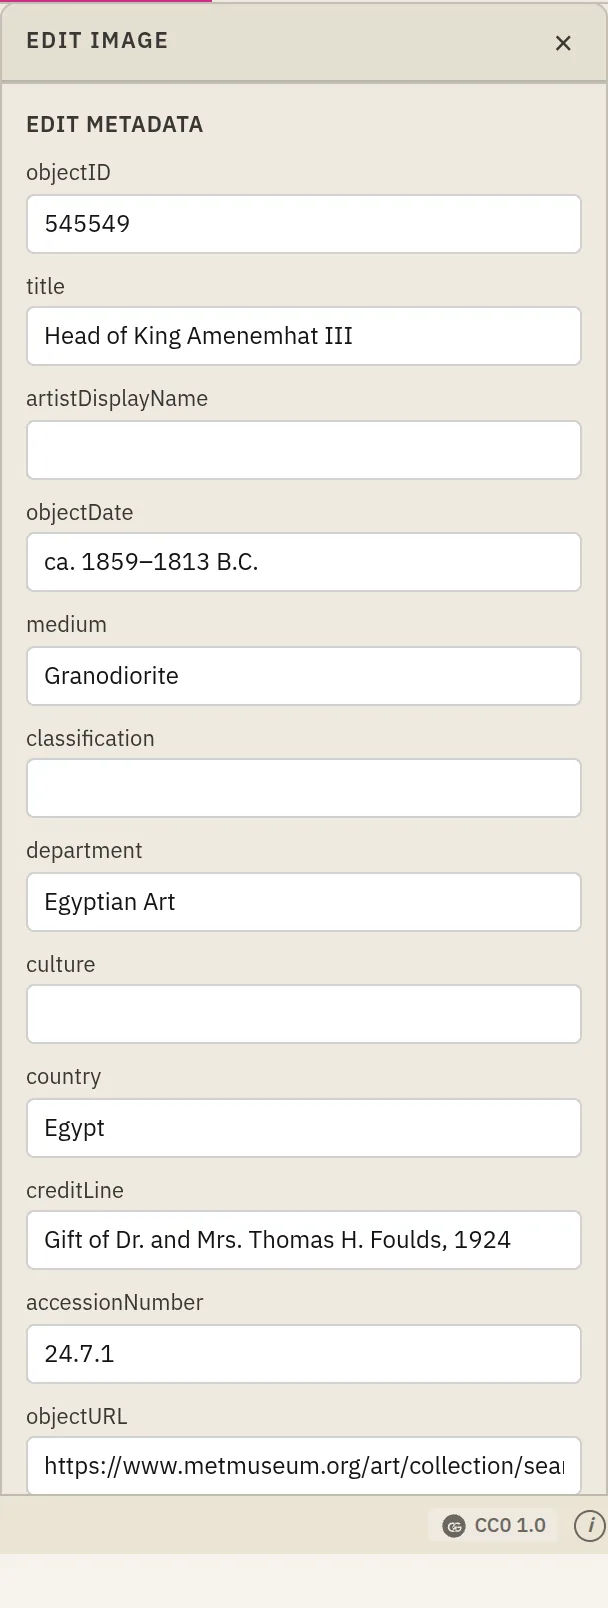
Each field adapts to its column type: numbers get a number field, dates a date picker, true/false columns a dropdown, and text columns with a small set of repeated values (department, classification, …) a pick-or-type list so you can choose an existing value or enter a new one.
A few rules:
- The identity / filename column (and Zegami’s internal
_-prefixed columns) can’t be edited — changing the join key would unalign images from their rows. - Edits work on any collection you can edit, including catalogue-sourced ones — but on a catalogue collection a future re-import overwrites the sheet, so treat the upstream source as authoritative there.
- To change many rows at once, use the whole-sheet Upload Metadata card instead.
Reprocess: what actually happens
“Reprocess” runs the same pipeline that built the collection initially, but it skips work for any image whose manifest entry already has the relevant derivatives flagged complete. Adding 50 new images to a 10,000-image collection takes the time to process 50, not 10,050.
For per-image actions (Replace, Rotate, Flip), the manifest’s per-image flags get cleared so the pipeline knows to rebuild just those slots’ derivatives, and the atlas step re-encodes just the tiles those slots fall in.
Troubleshooting
“I added images but they’re not showing up after reprocess.” Check that reprocess actually fired — the home page should show a brief “Processing N / M” banner. If it didn’t, the upload may have failed silently; refresh the Data tab and look for files in the Add Images “Currently uploaded” list. If they’re missing, re-upload.
“My replaced image still looks like the old one.” Browser cache. Hard-refresh the collection page (Ctrl+Shift+R / Cmd+Shift+R) — the atlas / pyramid URLs are cache-busted after reprocess publishes new tiles, but the page itself may be stale.
“Rotating doesn’t affect the hi-res image when zoomed in.” This happens for zip-imported collections where the source was a PDF, TIFF, or other complex format. Rotation rewrites the JPEG used for atlas + grid view, but the high-resolution pyramid is built from the original source file (which the rotation doesn’t touch). The grid view will look correct; the zoomed view shows the original orientation until a future release surfaces full-source rotation.
“Reprocess hangs at ‘Processing 0 / X new images’.” The pipeline may be queued behind another collection’s job. Check the home page’s activity feed. If it stays stuck for more than 15 minutes, contact support — the job may have failed silently and need to be retried server-side.
What’s not supported (yet)
- EXIF orientation auto-detection on upload. Cameras stamp an orientation tag into JPEG / TIFF headers; Zegami currently ignores this and uses the raw pixel orientation. If your photos look sideways after upload, use the rotate controls above.
- Per-frame orientation for multi-slice radiology / DICOM volumes. Those have their own axis-handling controls in the radiology viewer.
- Continuous rotation (arbitrary degrees). The rotate controls are 90° increments only.
- Adding a brand-new metadata column from the UI. Per-item editing changes existing fields; to add a column, edit the sheet and use Upload Metadata.